

Attention, cet article a plus d'une année d'ancienneté. Il est possible que les informations présentées ne soient plus à jour, spécialement dans le cadre d'un article technique.
Bonjour à tous,
Seboss666 m’a lancé un petit défi il y’a quelques jours. On parlait de vieilleries et là, il m’a défié de remettre le CERN httpd en production.
Pour information (source) :
CERN httpd (plus tard connu sous le nom de W3C httpd) a été le tout premier logiciel de serveur Web/HTTP au monde. Il fut initialement écrit en 1990 par Tim Berners-Lee au sein d’une équipe du CERN.
Pour info, je suis donc né 5 ans après la sortie de ce qui a été le premier serveur web au monde, qui a hébergé la première page d’internet (rien que ça).
Vous vous sentez vieux ? Pensez à moi, je n’étais même pas né. Ça fait donc bizarre de mettre la bestiole en production 26 années après sa sortie alors que j’ai 20 ans.
Pour info, une des dernières versions, que l’on va installer, est sortie en Juillet 1996, moi je suis né en Juillet 1995. Sympa hein ? En théorie je n’aurais jamais eu à mettre ce serveur en production sans Seboss 🙂
Histoire que ça soit accessible au plus de curieux possible, on va faire la procédure de A à Z depuis un droplet Digital Ocean 🙂
Prêt pour le voyage dans le temps ? Grimpez dans le TARDIS !

Création du droplet Digital Ocean :
Créez un compte digital ocean, activez-le et créez directement le droplet qui va bien en cliquant sur le lien suivant :
Un Debian 32 bits sera nécessaire pour la procédure. J’ai testé sur Debian 7 et 8 et ça marche, je ferais donc la procédure sur un Debian 8 plus récent (oui, même si on prod un truc vieux de presque 30 ans).
Après avoir cliqué sur le lien, cliquez directement sur le gros bouton vert en bas “CREATE”.
Vous recevrez un mail dans ce genre :
Your new Droplet is all set to go! You can access it using the following credentials:

Droplet Name: debian-512mb-fra1-01
IP Address: 46.101.191.153
Username: root
Password: 16230def4be26ed7

For security reasons, you will be required to change this Droplet’s root password when you login. You should choose a strong password that will be easy for you to remember, but hard for a computer to guess. You might try creating an alpha-numerical phrase from a memorable sentence (e.g. “I won my first spelling bee at age 7,” might become “Iwm#1sbaa7”). Random strings of common words, such as “Mousetrap Sandwich Hospital Anecdote,” tend to work well, too.

As an added security measure, we also strongly recommend adding an SSH key to your account. You can do that here: https://cloud.digitalocean.com/ssh_keys

Once added, you can select your SSH key and use it when creating future Droplets. This eliminates the need for root passwords altogether, and makes your Droplets much less vulnerable to attack.

Happy Coding,
Team DigitalOcean
Connectez-vous avec Putty et mettez un nouveau mot de passe.
Installation de CERN httpd :
Comme d’habitude, mettez à jour le serveur avec la commande suivante :
apt-get update && apt-get upgrade -y && apt-get install git curl -y
Maintenant, ajoutez les sources de Debian Potato dans votre fichier sources.list.
Ah oui, pour information Debian 2.0 dit Potato est sortie 1998, j’avais 3 ans et le regretté inventeur de Debian Ian Murdock venait de démissionné du projet.
echo "deb http://archive.debian.org/debian potato main" >> /etc/apt/sources.list
Maintenant, mettez la liste des packets à jour et installez cern-httpd :
apt-get update && apt-get install -t potato cern-httpd
root@debian-512mb-fra1-01:~# apt-get install -t potato cern-httpd Reading package lists... Done
Building dependency tree
Reading state information... Done
The following package was automatically installed and is no longer required:
liblockfile1
Use 'apt-get autoremove' to remove it.
The following NEW packages will be installed:
cern-httpd
0 upgraded, 1 newly installed, 0 to remove and 0 not upgraded.
Need to get 190 kB of archives.
After this operation, 664 kB of additional disk space will be used.
WARNING: The following packages cannot be authenticated!
cern-httpd
Install these packages without verification? [y/N] y <--- Répondez y
Get:1 http://archive.debian.org/debian/ potato/main cern-httpd i386 3.0A-3 [190 kB]
Fetched 190 kB in 0s (1,184 kB/s)
Selecting previously unselected package cern-httpd.
(Reading database ... 33604 files and directories currently installed.)
Preparing to unpack .../cern-httpd_3.0A-3_i386.deb ...
Unpacking cern-httpd (3.0A-3) ...
Processing triggers for man-db (2.7.0.2-5) ...
Processing triggers for systemd (215-17+deb8u4) ...
Setting up cern-httpd (3.0A-3) ...
defined(@array) is deprecated at /usr/sbin/httpdconfig line 461.
(Maybe you should just omit the defined()?)

------ cern-httpd configuration ------
Welcome to post-installation configuration of the CERN httpd.
Answering these questions will allow you to configure the daemon
to provide simple HTTP service on a port of your choice. You may
change the resulting configuration by running /usr/sbin/httpdconfig,
or by editing /etc/cern-httpd.conf

The CERN httpd can provide much more complex service than that initiated by
this script. If you are interested, look at the sample configuration files
in the directory:
/usr/share/doc/cern-httpd/examples

Actually, you should probably look at the documentation regardless of
the complexity of your HTTP service. After all, by running this server,
you're allowing others to anonymously access files on your machine.

The documentation for the CERN httpd is available, surprisingly enough,
on the Web. Point your favorite WWW client to the following URL:
http://www.w3.org/httpd/

Press [enter] to continue:  <--- Appuyez sur la touche Enter

------ Port Selection ------

Please choose a port on which httpd will listen for requests.
The default port, 80, is the standard location for HTTP daemons.
You can, however, choose another port if you wish.

If you choose a port number lower than 1024, you need to be root
to start the server. This is the normal mode of operation.

This option can be overridden on the command line.
Port [80]: <--- Appuyez sur la touche Enter

------ Users' Public HTML Directories ------

Httpd affords each user the opportunity to create a subdirectory
of their home directory in which they can place HTML files.
Then, when someone tries to grab the URL
http://your.machine/~user/file.html
They get the file 'file.html' from the public HTML directory of 'user'.

Here, you specify the name of the subdirectory in which users can place
HTML files they wish to share with the world. By default, this will be:
public_html
However, you can make it whatever you wish. It's a good idea to restrict
yourself to letters of the alphabet and dashes or underscores, but I'm
not going to force you to follow this guideline.

If you don't want users to be able to share HTML files with the world,
specify 'none' as the directory name.

Users' public HTML directory [public_html]: <--- Appuyez sur la touche Enter

------ Root of Document Tree ------

Please specify the complete name of the directory in which
all the body of documents served will reside.

If the directory you specify does not exist, it will be created
for you. The default directory is "/var/www".

Document directory [/var/www]: <--- Appuyez sur la touche Enter

------ Use a group for WWW document tree maintainers ------

I noticed that you already have a group called www-data.
Would you like me to change the group ownership of the WWW document tree
to this group and flag the tree so that any subdirectories created under
it belong to the group?

The directory and any future subdirectories will also, by default, be
writeable by this group.

You can change membership in the group by editing the file '/etc/group'
or by using the command 'adduser user www-data', where 'user' is the
name of an existing user.

Use document maintenance group? [yes]: <--- Appuyez sur la touche Enter
Creating configuration file...Done.
Putting sample Welcome.html file in `/var/www'... Done.
Changing ownership and mode of things in /var/www...Done.
insserv: warning: script 'cern-httpd' missing LSB tags and overrides
------ Configuration complete. -------

Your http daemon is ready-to-go; the server has been restarted.
At that point, anyone will be able to retrieve documents from your
machine. As such, you should review the setup and make sure that it
works with your overall security strategy.
There is a sample file called `Welcome.html' in your document
directory that will serve as a `home page' for your server until you
get a chance to edit your own. It contains a link to the httpd docs
and to Debian GNU/Linux bug reports. Please populate the Web with
lots of groovy things.
Press [enter] to continue: <--- Appuyez sur la touche Enter
insserv: warning: script 'K01cern-httpd' missing LSB tags and overrides
insserv: warning: script 'cern-httpd' missing LSB tags and overrides
Starting webserver: cern-httpd.
Maintenant, voici les commandes pour démarrer, arrêter et redémarrer le serveur web :
service cern-httpd start
service cern-httpd stop
service cern-httpd restart
Le serveur web tourne maintenant, lancez un coup de Curl pour voir les headers d’époque 🙂
root@debian-512mb-fra1-01:~# curl -I localhost
HTTP/1.0 200 Document follows
Server: CERN/3.0A
Date: Thu, 19 May 2016 19:20:26 GMT
Content-Type: text/html
Content-Length: 1000
Last-Modified: Thu, 19 May 2016 19:15:54 GMT
Non ma petite dame, HTTP/1.1 n’existait pas à l’époque … et moi qui vous explique comment mettre en place HTTP/2.0 aujourd’hui 🙂
Mise en place du premier site web :
Tant qu’à faire quelque chose, autant aller au bout du délire.
On va récupérer un clone complet du premier site web public et de toute la doc du World Wide Web Project. Rien que ça ! Le premier site web remis en ligne sur le premier serveur web nom de zeus !!!

Récupérez les archives publiques disponibles dans le repo public du premier navigateur web du cern (en ligne de commande) :
rm -rf /var/www/*
git clone https://github.com/cern-hackdays/lmb.git /tmp/lmb
mv /tmp/lmb/public/www/hypertext/WWW/* /var/www/
rm -rf /tmp/*
Maintenant, accédez au site comme ceci :
http://adresseip/WWW/TheProject.html
Vous voici sur la première page mémorisée de l’histoire d’Internet telle qu’elle fût écrite par Tim Berners-Lee au début des années 90.
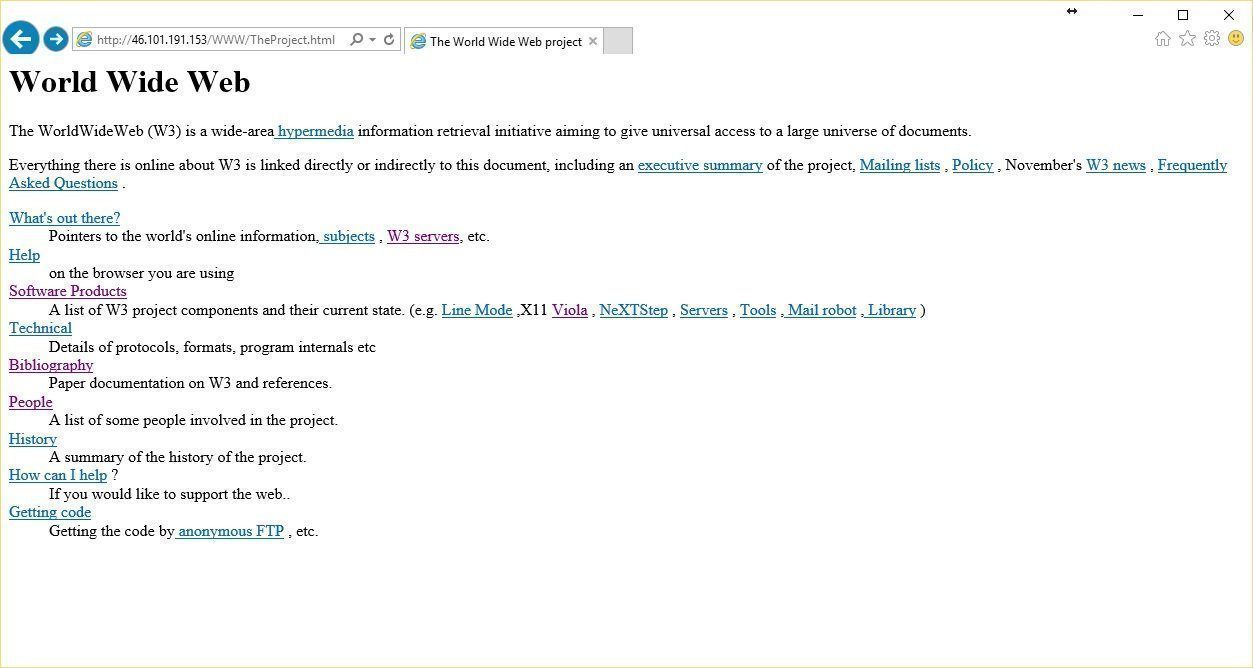
L’adresse :
http://adresseip/WWW/
Vous montrera tous les logiciels ayant été développés en parallèle du projet World Wide Web :
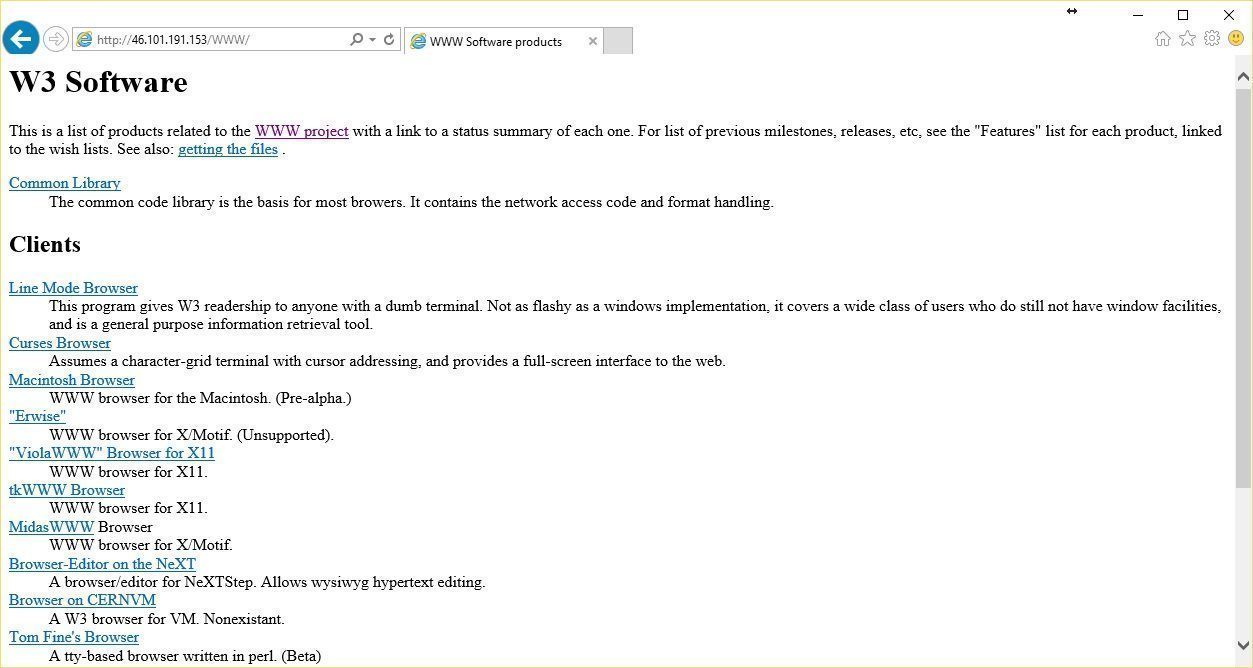
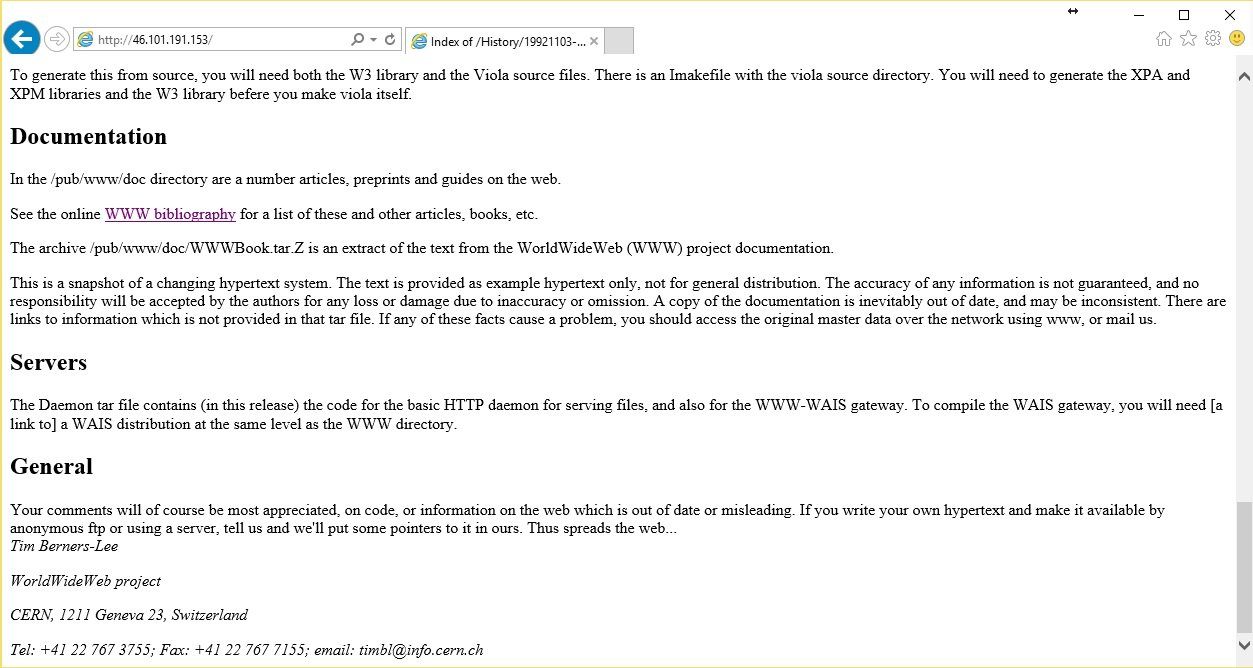
L’adresse :
http://adresseip/
Vous montrera quand a elle la première documentation de l’archive open source du World Wide Web avec en pied de page le contact direct de Tim Berners-Lee pour lui proposer des améliorations ou des corrections (à l’époque !) :
Vous pouvez accéder à l’archive officielle du CERN en cliquant ici.
Mais bon, ça a moins de charme quand sa passe par un serveur web Apache 🙂
Bon, l’article est fini et ça m’a fait un poil bizarre de vous faire une procédure pour installer quelque chose qui est sorti avant ma naissance.
J’espère que vous en profiterez comme moi pour faire le tour de ce qu’était Internet et pour voir aussi les prémices des logiciels open-sources 🙂
So vintage, j’adore :-))))