

Attention, cet article a plus d'une année d'ancienneté. Il est possible que les informations présentées ne soient plus à jour, spécialement dans le cadre d'un article technique.
Bonjour à tous,
Aujourd’hui, on va rapidement voir comment générer un certificat manuellement avec Let’s Encrypt.
Attention ! Dans cet article, Let’s Encrypt ne sera pas exécute depuis le serveur web et ce, pour plusieurs raisons.
- Le plugin NGINX est marqué comme EXPERIMENTAL
- Le script fait un SEGMENTATION FAULT avec mon kernel GrSec.
J’ai donc utilisé une autre machine virtuelle sous Debian 8.2 x64 comme le serveur pour créer mes certificats.
Installation des dépendances
Dans un premier temps, vous devez installer les dépendances de Let’s Encrypt sur vos deux serveurs (voir plus si vous avez plus d’un serveur web).
Pour cela je vais utiliser le script de Let’s Encrypt pour Debian / Ubuntu, lancez simplement la commande suivante :
wget -O- https://raw.githubusercontent.com/letsencrypt/letsencrypt/master/bootstrap/_deb_common.sh | sh
On va aussi installer GIT avec la commande suivante (ce n’est pas nécessaire pour vos serveurs web):
apt-get install git -y
Installation de Let’s Encrypt
Maintenant, on va installer Let’s Encrypt sur notre nouvelle machine Debian (qui n’exécute aucun serveur web donc).
Lancez les commandes suivantes :
cd /etc
git clone https://github.com/letsencrypt/letsencrypt
cd letsencrypt
./letsencrypt-auto --help
Si tout ce passe bien, vous aurez cette sortie :
root@letsencrypt:/etc/letsencrypt# ./letsencrypt-auto --help
Updating letsencrypt and virtual environment dependencies.......
Running with virtualenv: /root/.local/share/letsencrypt/bin/letsencrypt --help

letsencrypt [SUBCOMMAND] [options] [-d domain] [-d domain] ...

The Let's Encrypt agent can obtain and install HTTPS/TLS/SSL certificates.  By
default, it will attempt to use a webserver both for obtaining and installing
the cert. Major SUBCOMMANDS are:

(default) run        Obtain & install a cert in your current webserver
certonly             Obtain cert, but do not install it (aka "auth")
install              Install a previously obtained cert in a server
revoke               Revoke a previously obtained certificate
rollback             Rollback server configuration changes made during install
config_changes       Show changes made to server config during installation
plugins              Display information about installed plugins

Choice of server plugins for obtaining and installing cert:

--apache          Use the Apache plugin for authentication & installation
--standalone      Run a standalone webserver for authentication
(nginx support is experimental, buggy, and not installed by default)
--webroot         Place files in a server's webroot folder for authentication

OR use different plugins to obtain (authenticate) the cert and then install it:

--authenticator standalone --installer apache

More detailed help:

-h, --help [topic]    print this message, or detailed help on a topic;
the available topics are:

all, automation, paths, security, testing, or any of the subcommands or
plugins (certonly, install, nginx, apache, standalone, webroot, etc)

root@letsencrypt:/etc/letsencrypt#
Génération des certificats
Maintenant, on va générer les certificats avec la commande suivante :
./letsencrypt-auto certonly -d abyssproject.net -d www.abyssproject.net --manual
Remplacez abyssproject dans la commande par votre nom de domaine. Mettez tous vos sous-domaines dans la commande directement avec l’option -d pour chaque sous domaine supplémentaire !
Le script vous demandera une adresse email, ne vous trompez pas, il vous préviendra lors de l’approche de l’expiration d’un certificat !
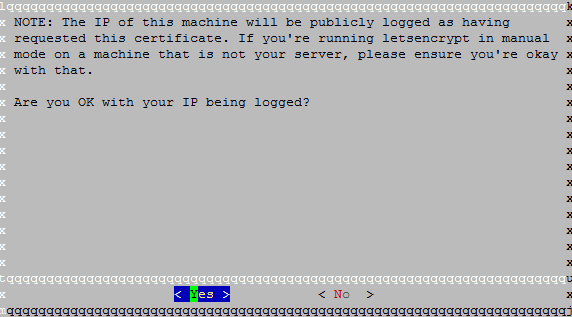
Ensuite, il vous demandera s’il peux garder l’adresse IP de la machine qui demande le certificat, répondez oui :
Ensuite, le script vous donnera un bout de code à copier sur le serveur qui héberge votre site web :
mkdir -p /tmp/letsencrypt/public_html/.well-known/acme-challenge
cd /tmp/letsencrypt/public_html
printf "%s" -q1Y6Nm_WMT5Spm31945mAnLsKbFWIliAJ-9dydwMcg.RH2WcoWgaevd3Ia1izMD_sHERhFFXZrO4UMkXh0HHq0 > .well-known/acme-challenge/-q1Y6Nm_WMT5Spm31945mAnLsKbFWIliAJ-9dydwMcg
# run only once per server:
$(command -v python2 || command -v python2.7 || command -v python2.6) -c \
"import BaseHTTPServer, SimpleHTTPServer; \
s = BaseHTTPServer.HTTPServer(('', 80), SimpleHTTPServer.SimpleHTTPRequestHandler); \
s.serve_forever()"
Coupez Nginx sur votre serveur Web avec la commande suivante et exécutez ce code :
service nginx stop
mkdir -p /tmp/letsencrypt/public_html/.well-known/acme-challenge
cd /tmp/letsencrypt/public_html
printf "%s" -q1Y6Nm_WMT5Spm31945mAnLsKbFWIliAJ-9dydwMcg.RH2WcoWgaevd3Ia1izMD_sHERhFFXZrO4UMkXh0HHq0 > .well-known/acme-challenge/-q1Y6Nm_WMT5Spm31945mAnLsKbFWIliAJ-9dydwMcg
# run only once per server:
$(command -v python2 || command -v python2.7 || command -v python2.6) -c \
"import BaseHTTPServer, SimpleHTTPServer; \
s = BaseHTTPServer.HTTPServer(('', 80), SimpleHTTPServer.SimpleHTTPRequestHandler); \
s.serve_forever()"
Maintenant, retournez sur le serveur hébergeant Let’s Encrypt et appuyez sur Enter lorsque le serveur Python est démarré sur votre serveur Web.
Refaite la manipulation pour chaque sous-domaine rentrée dans la première commande. Une fois que c’est fait, vous aurez ce message :
IMPORTANT NOTES:
- Congratulations! Your certificate and chain have been saved at
/etc/letsencrypt/live/abyssproject.net/fullchain.pem. Your cert
will expire on 2016-03-05. To obtain a new version of the
certificate in the future, simply run Let's Encrypt again.
Maintenant, rendez-vous dans le dossier suivant :
cd /etc/letsencrypt/live/abyssproject.net
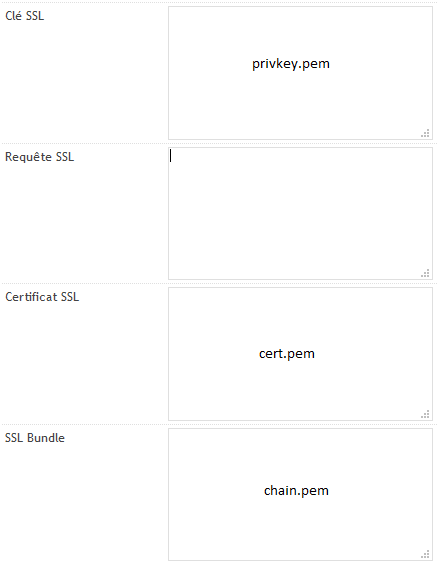
Vous aurez 4 fichiers présents dans ce dossier à savoir :
- cert.pem -> Certificat principal
- chain.pem -> Chaine de certificats supplémentaires
- fullchain.pem -> Certificat principal + Chaine de certificats supplémentaires
- privkey.pem -> Clé privé du certificat
Maintenant, il ne vous reste qu’à installer le certificat sur votre serveur web.
Voici la correspondance pour ISPConfig par exemple :
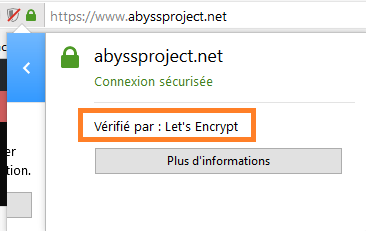
Pour finir, admirez le résultat :
À propos des certificats Let’s encrypt et de leurs perfs, apparemment il est prévu qu’ils supportent l’ECDSA https://letsencrypt.org/upcoming-features/ et d’après CloudFlare, en terme de perfs (comme de sécu), c’est le jour et la nuit https://blog.cloudflare.com/ecdsa-the-digital-signature-algorithm-of-a-better-internet/
Salut, t’aurais un technique pour le renouvellement automatique via script et cron?
Salut,
Presque, faut juste que je teste le comportement que le bidule peut avoir avec une sortie dans /dev/null ou dans un log en cas de problèmes.
“Le script fait un SEGMENTATION FAULT avec mon kernel GrSec.”
Salut, en effet mais c’est remédiable facilement :
paxctl -cm ~/.local/.local/share/letsencrypt/bin/python2
Salut,
C’était :
Un grand merci 😉